
By Columnist Ryan Minkler, Owner of NorthCulture Garden Supply
Many gardeners will use seed stock for their crop but a popular alternative is to take a clone, or cutting of the desired plant. This will ensure that all the same properties will be expressed in the cutting that were present in the “mother” plant, whereas seed stock may display a less consistent harvest. In this article, I will provide you with general guidelines to taking a healthy, strong cutting.
First off, understand that every strain, or plant is different. Some strains take root easier and some don’t take root at all. I have never encountered a strain that will not root, but that doesn’t mean they don’t exist. It’s best to wait until the plant you want to clone is somewhat established – about 12” – 18” tall at a minimum. I like to train my mother plants to have lots of tops, maybe 6-12 branches that are about the same height on the canopy but the more tops the better so keep this in mind as you take cuts from your mother plant; think long-term. This top growth is the newest growth which means the stalk will be a bit “fleshy” as opposed to a “woody” lower, older branch. Generally speaking, the woodier stalks take longer to root but are likely to form roots whereas the fleshier stalks will root quicker but are a bit less likely to form roots at all. Personally, I haven’t had a problem rooting most fleshy stalks.
Take a pint glass or similar sized container and fill it a few inches from the top with filtered water preferably. I like to add either Dip N Grow, or KLN which are both rooting hormones that will soften the tissue and make it easier for the cambium, the layer of tissue that turns into roots, to develop. Now choose the parts of the mother plant that you would like to turn into her next generation. Be sure to include at least two or three node sites (part of the branch where the leaf is forming) in each cut. Remove any green foliage that will be below the surface with the razor. Some gardeners like to shave the outermost layer of skin, or epidermis, from the bottom of the cut where the root will form, this may increase your rate of success but it is more time consuming. On the top of each cutting there should only be two or three leaves so remove any large leafs that may still be present. To further increase your chances for success cut the tips of each leaf blade off of the remaining foliage. This helps the plant retain moisture while root development occurs.
Place the cut in the hormone solution and continue to take the rest of your branches. I try to let each branch soak for at least 15 minutes, for harder woods or woodier stems allow a bit more time if possible.
Prepare your propagation media. Whether it is rock wool, oasis, willow bark plugs, peat, or even a clone machine there are steps for preparation. If you have KLN or Clonex Solution, dilute to the recommended ratio and soak your flat of cubes or plugs. Be sure to drain off any excess before loading it with cuttings. For plugs, ring them out to the consistency of a moist sponge, for rock wool be sure to ph the water to about 5.5 and let the flat marinate for a while to neutralize. After the flats have soaked pour a bit of cloning gel into a small lid or shot glass. I recommend Clonex or Rootech for this step. Most gels on the market are simply acting as anti-fungal agents while providing some rooting hormones; they are all pretty similar.
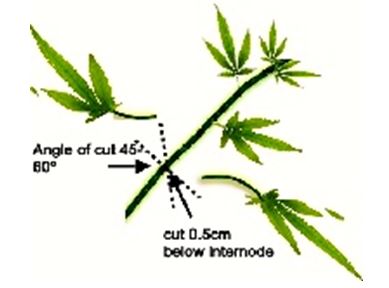
Now we are ready to take our “final cut” and begin the rooting process. Take the branch that has been soaking the longest and remove it from the solution. Use a hard, sterile surface and a sharp blade to take your final cut at a 45 degree angle about 1/4” below a node site (see image below). The significance of the angle is simply to expose more surface area of the cambium. A clean cut using a scalpel or razor blade is important so as not to crush the tissue, which is why scissors are a bad idea for the final cut. If you do use a razor be sure to clean it with alcohol to sterilize it. Often times razors are coated with an oil to prevent rust, this should be cleaned off before cutting the tissue. (Caution: Remember to be extremely careful if using a razor or scalpel for this purpose, as they are extremely sharp and can cause injury!) Submerse the bottom 1/4-1/2” of stem into the cloning gel and immediately place in the pre-formed hole of the propagation media. Be quick and clean during this part of the process. Sometimes an air pocket, or embolism can get trapped in the plants stem preventing root development, for this reason some cultivators will take their final cut under water. Personally I haven’t tried this method but it couldn’t cost much but time. Repeat until you have the desired amount of cuts on your flat. Consistency is a good theme to remember for cloning. Maintain a consistent temperature at the root zone and above. Heat mats achieve this and are relatively inexpensive to buy and humidity domes act as a good environmental buffer. Place the flat on a heat mat, or shelf in a maintained environment of about 70-85 degrees. Maintain a consistent dampness to your media, never allowing it to dry out (unintentionally) or stay too wet.
One of the most common propagation mistake I’ve seen is gardeners watering their flats too much, suffocating the area that requires oxygen to develop roots thus forming a brown slime. If the brown slime shows up, it’s time to start over. Maintain a consistent light schedule. A full-spectrum florescent bulb is all the light the cuttings need for now. You can set it on a timer for 18 or more hours of light per day, personally I leave mine on 24 hours – but that’s just what has worked for me.
After a couple days, you can opt to take the humidity dome off. Some say this helps create a stronger, more resilient plant….maybe. If you do this, be sure to monitor them closely and mist them often. Try to maintain a consistent moisture in the medium. If you let your flat or plugs get a little on the the dry side around day 4 or 5 ,without drying out completely, it tends to desperately look for water by forming calluses, these clusters of cells uptake nutrients and transform into roots after about a week. I’ve seen roots develop in as little as five days and take as long as three weeks, so practice patience and consistency!
Feel free to contact me via email at: [email protected] with any questions or feedback regarding gardening in general. You can call (707) 465-4111 or visit our store, NorthCulture Garden Supply located at 1070 Hwy 101 N., Crescent City across from Patriot Gas. We have a large selection of products and a knowledgeable staff to help with any obstacles you might encounter. Thank you and remember to Promote Green Life!


Thank you and yes it was. However, the information in the article can apply to all types of plants – that one’s just my favorite.
Nice story, was the 420 graphic intentional ? Or was this just about potted plants ?