By Ryan Minkler, owner North Culture Horticulture
 Ah, the many steps to maintaining a bountiful harvest. “Just find a sunny spot, put some seeds in the dirt and give em water, right?”
Well yes, and no. You could do the bare minimum and hope that everything falls into place just right, or you could go above and beyond the inimum and better your chances for success come the fall. While there are hundreds of optional steps that can be taken to improve your garden, there are a few that I would consider “essential.”
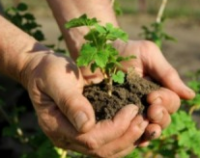
A timely, proper transplant is one of these essential steps.
First, we must determine the size of pot for this stage of transplant. Think about how big you want your plant to be when it is finished and determine what size container will accommodate this. For my outdoor crop, I keep increasing my pot size seasonally as I have found that the more fresh soil available for my plant’s roots to fill, the larger my harvest is at the end of the year. It’s as if the plant knows what capacity it has to work with and will produce flowers accordingly. If the roots are too concentrated in the media then when it comes time to bloom the plant seems to understand these restrictions and the flowers will only reach a certain size. However, if the roots can still grow and develop – especially in that first transitional month
(August up here) – it will be reflected in a larger, denser, healthier bud. That being said, I wouldn’t transplant out of anything larger than a 10 gallon pot into my final container. Anything over this size becomes difficult to handle and transplanting without damaging the plant becomes very challenging. There is also the potential to suffer a longer transplant-shock period the larger the root mass is…..but I’m getting ahead of myself.
Let’s start with a small clone that we will transplant into a 3.5” square plastic pot. These pots are nice because they fit 18 into a standard 10”x 20” propagation tray which allows for efficient use of space. When transplanting clones, it’s important to make sure theyhave roots exposing themselves from out of the cube or plug. If you are coming out of an EZ Cloner, or other aeroponic propagation machine, it’s nice to prune the long roots that will form. I usually will cut the root back to about 3-4” below the bottom of the stem. This will help the roots grow more evenly into your media rather than just spiraling it into the pot forming a root mat at the bottom.
Place all your containers in a grid somewhere that will allow you to sweep up any excess soil. Pour directly from the bag or shovel in the soil to fill all your pots loosely to the brim. The selected soil for younger plants should be lighter in nutrients and drain well. Soils with a lot of nutrients can be overwhelming for a young plant resulting in a curled tip of the leaf, like the plant is curling it’s toes to bare the “hot” media. Zen Blend, Black Gold, Pro Mix HP would be a few good choices for younger plants. I use a 2 x 4 or straight edge of any kind to evenly grade the surface and remove excess soil in an efficient manner. Now saturate this soil with any root stimulator or light nutrient solution, this will give the roots something to strive for when they are in their new homes and it will bring the soil level down to make room for the green beauty who’s moving in. Find a piece of wood, or PVC, or anything that will make an impression in the soil of about the pot size that the plants are being transplanted from. For example, I use a 2”x 2” furring strip for transplanting clones. This saves you time, makes a perfect size hole and your back will appreciate not bending over so much.
Many of you may be familiar with mycorrhizae. Usually found in a powder form – but sometimes liquid, it is a fungus-formed symbiotic relationship with the root structure of vascular plants. It is essential in helping the plant survive the transplant with minimal shock. I like to use a product called Mykos for granular, or Root-Dip by MicrobeLife for liquid inoculation. Simply sprinkle a modest amount (maybe 1-2 tablespoons) where the new roots will be placed in your container. Remove the plant from it’s pot and gently loosen up the concentration of roots before placing them directly in them hole. It is important to establish direct contact with the roots, which is a benefit to using the liquid dip. If you decide to use a dip, then mix the recommended amount in a five gallon bucket and dunk the roots in the solution while massaging them loose, directly exposing more root-mass to the soup of beneficial bacteria and fungi.
Now fill the pot about an inch from the brim with more soil. This will allow water to pool up rather than spill over the side, wasting precious nutrients. If you are outside then place the plants in a shady place, under a shade cloth, or in a greenhouse for a few days; if indoors, place them under florescent lights or pull your indoor hoods up about 48” above the canopy for a few days. Metal Halide bulbs, LED’s, Plasma, or Induction lighting typically emit a “bluer” spectrum which the plant desires for it’s vegetative cycle – more similar to the sun’s spring and summer spectrum. It is gentler on the leaves than the more intense red spectrum which appears during fall and winter. Too much light too quickly will cause “sunburn” (in extreme cases) for the plant.
Similar to if you were to stay inside all winter with little sun, then go sunbathe naked down in Costa Rica with no sunblock….ouch! The plant needs to be taking in nutrients and water to stay cool, but since the roots are in a state of shock, the uptake is too slow to keep up with the level of photosynthesis the sun demands, thus the plant’s foliage bleaches white or pale yellow and eventually dies off. Think: running your vehicle with barely any coolant in it. It’s good to mist your plants a few times a day during this transition period and pay close attention to the weight of the pot; this is the most accurate way I have found in determining when to water next.
Remember not to overwater and suffocate the roots!!!
After about a week or two (larger plants generally take longer to adapt), the plant should be regularly demanding water and nutrients (depending on what’s in your soil). Indoors, the shock period lasts only a day or two in most cases and you can gradually lower your hoods to the preferred level.
Hope this information has given you a little direction when it’s graduation day for your garden.
Come visit our store NorthCulture Garden Supply, located 1070 Hwy 101 next to Alisa’s Coffee on the north end of Crescent City. Contact us with any questions or comments at [email protected] or 707-465-4111.
Mention that you saw my ad, or read this article in the Crescent City Times and receive 15% off any items in the store except soil….sorry, not much margin to work with there. Thank you for your time and as always “Promote Green Life.”

